Banoffee PiePrint Recipe

My Best Days Ever

I am a huge fan of a pie, any pie and I do try to avoid them because when I do allow myself the pleasure of making or purchasing a pie, I enthusiastically embrace the idea of having it for breakfast lunch and dinner. My favorite pie in the world? hands down Eli’s Apple Pie (from Eli’s/Zabar’s in New York).

Anyway, I digress. It is hard to go wrong with a base covered in luscious caramel, then topped with vanilla infused whipped cream, a layer of thinly sliced banana and then more whipped cream. Delicious!

Banoffee Pie

I have been wanting to make one of these ever since I saw Keira Knightly waving it around as a peace offering in Love Actually. In fact, maybe even before then.

Banoffee Pie is not really Summer fare, I think it may work best after a big Winter roast but it is so good that any dessert minded person won’t care when you serve it, or what it comes after – it is so darn good!

IMG_0420

Ingredients
2 x 400g cans of sweetened condensed milk
180g unsalted butter, chopped
375g graham crackers or digestive biscuits
60ml thickened cream
Scraped seeds of 2 vanilla beans
75g icing sugar, sifted
4 bananas
30g dark chocolate, finely chopped

*Start this recipe a day or two ahead*

Place the cans of condensed milk in a large saucepan of water and bring to the boil over a medium heat. Reduce heat to a simmer and cook for 2 hours adding water to ensure cans remain covered by at least 2 inches of liquid. Remove saucepan from heat and allow cans to cool completely before removing them from the water then store in your fridge for a couple of hours or until you are ready to use them (up to 2 weeks).

Melt butter in a small saucepan, and then cool slightly. Crush biscuits/crackers by hand or in a food processor to resemble fine crumbs, add the butter and combine. Press crumb mixture over the base of a greased 28cm loose based tin then refrigerate for 30 minutes to firm the base.

Open the cans of condensed milk and spoon caramel evenly over the biscuit base, cover with cling wrap and refrigerate overnight to firm.

Using an electric mixer whisk the cream, vanilla bean seeds and sugar till stiff peaks form. Cut bananas into thin slices. Remove pie from tin and loosen base and place on a plate. Spoon half the whipped cream over the caramel filling, then place the bananas in an overlapping circle working from the outside in. Top with the remaining cream and sprinkle with chocolate.

Best served immediately.

Yield: Serves 12

Source: adapted from Fratelli Fresh

IMG_0430

Posted in Desserts, Fruit, Tarts/Flans/Quiches/Pies | Leave a comment

Slow Cooked KalePrint Recipe

Slow cooked Kale

My father is growing kale in his veggie garden as I type, his conundrum is how to prepare it when it is fully grown. Not being a juice man, he asked me and I had to think – and think hard.

Kale is part of my daily ‘greens’ intake but aside from blending it with some like-minded vegetables and fruit, I really do not do that much with it.

And then I remembered my stuffing from last Thanksgiving – Suzanne Goin’s sensational Kale Dressing (which is basically a stuffing so that is what I am going to call it). This particular dish requires a good amount of slow cooked kale, which is so incredibly tasty on its own that I would quite happily eat a bowl of it for dinner.

And all of this seems very apt because it is Thanksgiving tomorrow and it is one of my most favorite celebrations. It is an occasion that embraces us all – no matter what your ancestry or religion. So happy Thanksgiving and and happy Kale eating!

3/4 teaspoon kosher salt, divided, plus more
1 pound Tuscan kale (about 2 bunches), center ribs and stems removed
1/4 cup plus 2 tablespoons extra-virgin olive oil
1/2 sprig rosemary
1 dried chile de árbol, broken into 4 pieces
1 cup sliced yellow onion
Freshly ground black pepper
2 garlic cloves, thinly sliced

Bring a large pot of heavily salted water to a rapid boil over high heat. Working in 2 batches, blanch kale for 2 minutes. Drain, let cool, and squeeze out excess water with your hands. Coarsely chop; set aside.

Heat a large pot over medium heat for 2 minutes. Add 1/4 cup oil, rosemary sprig, and chile. Let sizzle, shaking pan often, for about 1 minute. Reduce heat to medium-low; add onion. Season with 1/2 teaspoon salt and a pinch of pepper. Cook for 2 minutes, stirring often; stir in garlic. Cook, stirring often, until onion is soft and starting to brown, 5-7 minutes.

Add remaining 2 tablespoons oil and kale; stir to coat. Season with 1/4 teaspoon salt, reduce heat to medium-low, and cook, stirring often, until kale turns almost black and is slightly crisp at edges, about 30 minutes. Let cool. Discard rosemary and chile.

Source: Suzanne Goin

Notes: Perfect on its own or as a side dish to a nice steak. Even better as an integral ingredient in Suzanne Goins Kale Dressing.

Posted in Recipes | Leave a comment

Grilled Haloumi, Mint and ProscuittoPrint Recipe

IMG_0365

There is not much to this recipe – not much at all. In fact you cannot really call it a recipe, it’s more of a combination of ingredients with wonderful flavors that marry perfectly and bring out the best in each other – just like a marriage should. Either way, they make many delicious mouthfuls.

I wish I could say that I came up with this little selection of flavors myself but I didn’t. I was served it last Summer, on a yacht that was moored off Sag Harbour on Long Island. I know, it all sounds very decadent – well, it was. And lot of Rose went into that particular afternoon too.

This little number is perfect as a casual starter or part of an alfresco tapas style meal – it even holds its own, when all you feel like is something very simple and simply sensational.

So here goes;

Ingredients
Haloumi
Mint
Procuitto (very thinly sliced)

Wash mint and arrange on your platter, alongside the slices of proscuitto.

Slice haloumi to 1/4 inch or 5mm thick. Grill on a very hot barbecue or on your stove top in a heavy based skillet (no oil required). Ensure you get them nice and crispy.

Place on platter and eat together (mint + prosuitto + haloumi).

Source: Sophie and Peter Herzig

Notes: This recipe is not worth trying unless you have access to excellent proscuitto and haloumi. I find the Aphrodite haloumi is great and believe it or not, the cheapest place to purchase it in Sydney is Simon Johnson in Woollahra (Australia).

Posted in Nibbles & hors d'oeuvres, Starters | Leave a comment

Braised Iberico Pork with Tomatoes, Chorizo, Thyme & Black OlivesPrint Recipe

I am going through a little chorizo phase, where many of the dishes I have cooked of late contain this wonderfully spicy sausage. From Suzanne Goin’s Lamb stuffed with Chorizo and Olives to Nano Crespo’s Cannelini Bean Stew with Chorizo and Swiss Chard, and then there is this – a little braised pork in a very Spanish influenced combination of tomatoes, chorizo and olives. It is heavenly! and one of the more pleasing & feel good dishes I have cooked throughout the last couple (and a bit more) of cold, cold months.

We have eaten this with Patatas Fritas (as the chef suggested) but it would also work really well served in small portions, as part of a tapas menu. Enjoy!

1 kilo/2.2 pounds boned shoulder of pork, ideally Iberico, cut into 3cm chunks
4 tablespoons olive oil
3/4’s cup/150 mls red wine
2 medium onions, chopped
6 cloves garlic, finely chopped
200 grams/7 ounces fresh chorizo, skinned and chopped
2 teaspoons sweet pimento
2 tablespoons tomato puree
400 grams/14 ounces skinned, chopped tomatoes, fresh or canned
300mls/ 1 1/4 cups chicken stock
leaves from 3 large thyme sprigs
2 tablespoons fresh oregano, chopped
4 fresh bay leaves
3 tablespoons sherry vinegar
2 teaspoons caster (superfine) sugar
100 grams/ 3 1/2 ounces good quality pitted black olives
sea salt and freshly ground black pepper

Season the pork with salt and pepper. Heat 2 tablespoons of the oil in a large flameproof casserole dish and sear the pork in batches until nicely browned. Set aside in a bowl.

Add the wine to the pan and as the liquid bubbles up, scrape the base of the pan with a wooden spoon to release all the caramelised juices. Pour over the pork.

Add the remaining oil to the pan with the onions, cover and gently fry for 15 minutes, stirring now and then, until they are very soft and lightly browned. Add the garlic and the chorizo and fry for a further 2 – 3 minutes. Stir in the pimenton and cook for 1 minute, then add the tomato puree, tomatoes, chicken stock, thyme leaves, oregano and bay leaves.

Stir in the pork and all the juices, season with salt and pepper, cover and gently simmer for 1 hour until the pork is almost tender.

Put the sherry vinegar and caster sugar into a small pan and boil until reduced to about 1 teaspoon. Stir it into the casserole with the olives and simmer, uncovered for another 20 – 30 minutes until the sauce is nicely reduced and the pork is tender. Adjust the seasoning to taste and serve with patatas fritas.

Source: Jose Pizarro via Cookhouse, the food magazine of Soho House

Notes: if you have trouble finding sweet pimento, you can substitute it with finely diced red capsicum (pepper)

Posted in Mains, Meat | Leave a comment

Green Beans with Brown Butter, Wild Mushrooms and WalnutsPrint Recipe

Thanksgiving has crept up rather quickly this year. Here I was thinking I that I had another two weeks to decide on my Thanksgiving menu but no, the big event is next Thursday – and I haven’t even contemplated how I am going to cook the turkey. Ordinarily I brine a day ahead and then roast but this year I am torn between a recipe I saw in the New York Times for steaming it and Suzanne Goin’s combination of brining and roasting the breast, alongside a turkey leg confit – as you can see, I have some big decisions to make.

So aside from the turkey, there are the sides. My mainstays are a type of potato and a bean – I then do a another vegetable and a salad. I started my bean trial with this recipe – I found it on the Williams Sonoma website and it is simply sublime.

Now, when it comes to bean dishes, I must say I love my beans in miso recipe because it is not only incredibly tasty, it is also healthy. This dish is also full of flavour, just a little more on the decandant side – as anything with eight delicious tablespoons of brown butter would be.

The brown butter and toasted walnuts make a deliciously nutty dressing for green beans, while the wild mushrooms lend an earthy flavour to the dish. And I probably don’t need to say this, but this dish would be perfect with your Thanksgiving bird.

Ingredients
1 teaspoon sea salt plus more to taste
900 grams/2 pounds green beans, trimmed
8 tablespoons unsalted butter
8 shallots, thinly sliced
226 grams/8 ounces wild mushrooms, brushed clean, stemmed and roughly chopped
Freshly ground pepper, to taste
1 cup toasted walnuts, chopped

Bring a large pot of water to a boil over high heat. Generously salt the water, add the green beans and cook until tender, about 5 minutes. Using a slotted spoon, transfer the beans to a bowl of ice water to stop the cooking. Drain and set aside.

In a large sauté pan over medium heat, melt the butter and cook until the milk solids start to turn golden brown, about 5 minutes. Add the shallots and cook, stirring occasionally, until tender, about 5 minutes. Add the mushrooms and cook, stirring often, until tender, 5 to 7 minutes. Stir in the 1 teaspoon salt and season with pepper. Stir in the green beans and walnuts and cook until the beans are warmed through. Taste and adjust the seasonings with salt and pepper. Transfer to a warmed serving bowl and serve immediately.

Yield: Serves 10 to 12

Source: Williams Sonoma

Posted in Sides, Vegetables, Vegetarian | Leave a comment

Fall Sugar CookiesPrint Recipe

There were all sorts of reasons to make these last week, from a Fall themed bake sale to a Halloween celebration – and what is an event without customised sugar cookies.

Although my sugar cookie skills are getting marginally better, these are certainly not my finest. But the kiddies love them and I love making them, so all is good. Aside from all things Fall and Halloween, they may be a good project for those of you who are stuck inside at the moment (with power – for those of you in NYC and surrounding area’s that have just been hit by Hurricane Sandy). They didn’t stop my girls from climbing the walls, but they certainly filled in a couple of hours which was an absolute blessing.

The recipe is here – make sure you look at the tips and tricks because they will make a world of difference to the final product. And remember – practice makes perfect!

Posted in Biscuits/Cookies/Slices/Bars, Childrens Parties, Morning Teas/High Teas | Leave a comment

Chocolate Brownie CookiesPrint Recipe

As far as chocolate cookies are concerned, these contenders are a heavyweight – with the chocolate content in one batch weighing in at just under 2 pounds.

Despite this, they are not overly dense or fudgy in texture, just perfectly crisp and chewy with a rich chocolate flavour.

Not quite the cookie for a school lunch box but perhaps a nice treat after an afternoon full of activity and a big pile of veggies for dinner.

Ingredients
453 grams/1 pound semisweet chocolate, chopped
4 tablespoons unsalted butter
4 large eggs, at room temperature
1 1/2 cups sugar
1 teaspoon pure vanilla extract
1/4 teaspoon salt
1/2 cup all-purpose flour, sifted
1/2 teaspoon baking powder
340 grams/12 ounces semi-sweet chocolate chips

In a large bowl set over a saucepan of simmering water, melt the chopped chocolate with the butter, stirring a few times, until smooth, about 7 minutes.

In another large bowl, using a handheld electric mixer, beat the eggs with the sugar at medium speed until thick and pale, about 5 minutes. Beat in the vanilla and salt. Using a rubber spatula, fold in the melted chocolate, then fold in the flour and baking powder. Stir in the chocolate chips. Scrape the batter into a shallow baking dish, cover and freeze until well chilled and firm, about 1 hour.

Preheat the oven to 350° and line 2 baking sheets with parchment paper. Working in batches, scoop 2 tablespoon size mounds of dough onto the prepared baking sheets, about 2 inches apart. Bake for about 10 minutes, until the cookies are dry around the edges and cracked on top. Let the cookies cool on the baking sheets for 10 minutes, then transfer to a rack to cool completely before serving.

Yield: around 30 cookies

Notes: The texture of these cookies will differ depending on the cocoa content of the chocolate you use – semi sweet is my favourite but feel free to experiment.

Source: Belinda Leong for Food & Wine

Posted in Biscuits/Cookies/Slices/Bars, Childrens Parties, Chocolate, Morning Teas/High Teas, Picnic Food, Recipes | Leave a comment

Pear & Frangipane TartPrint Recipe

A couple of years ago when we went to Paris, we stayed in a little apartment in the Marais that sat very near to a host of excellent patisseries. Every afternoon, Mr Man would go out and shop for our afternoon treat, and it quite quickly became a way of life. Needless to say when we arrived home from our vacation, at around 3 o’clock, I found myself pacing the room, feeling quite distraught and suffering from ‘fabulous pastry’ withdrawals.

I gradually overcame these feelings and eventually forgot about our little decadent ritual – until a couple of weeks ago, when Eric Kayser opened a patisserie at our front door. Now, in even less time than Mr Man took in the heart of Paris, I can get my fix and it is not even a minute away.

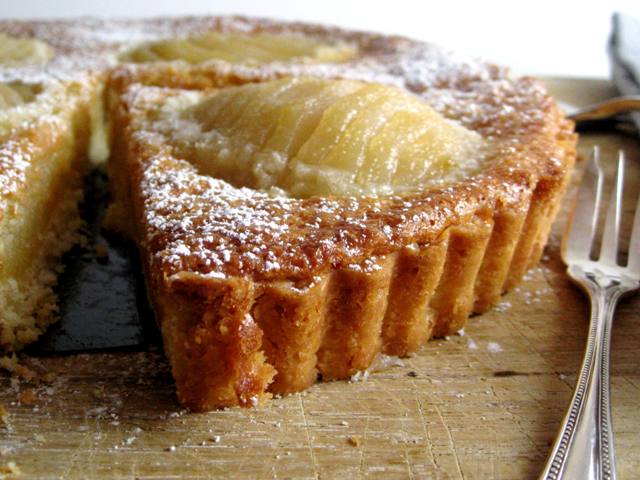
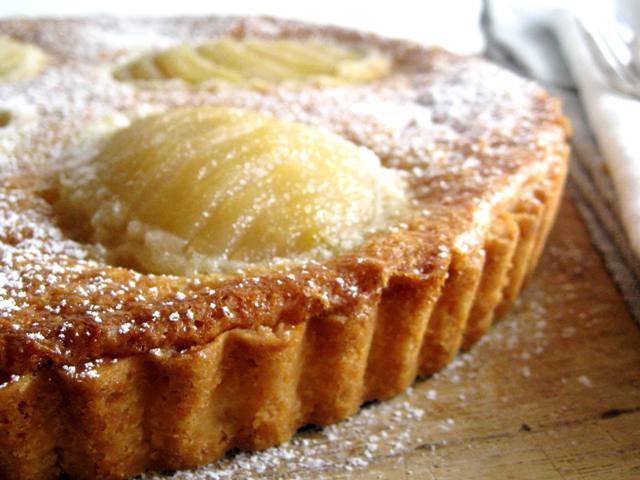
So, all this thinking about patisseries and fabulous French pastry got me thinking about some of my favourite treats – and this is one of them. A classic Pear and Frangipane Tart is about as good as it gets when it comes to quintessential French desserts. Slightly adapted from a recipe by Dorie Greenspan, it is relatively quick and easy and can be made in stages over a day – or even two.

The pears are poached in a sugary syrup with just a touch of lemon to scent them. I don’t like to add to much else to the liquid – I prefer the flavour of the pear to be absolute. These are nestled in a bed of frangipane, which is essentially a baked almond cream (a luscious one at that), on top of a buttery base of pâte sablée.

I know I could easily pop next door for one of these but it is nice to know I can also whip one up myself…

Pâte Sablée
1 1/2 cups flour
1/2 cup confectioner’s sugar
1/2 teaspoon salt
9 tablespoons butter, very cold, cut into small pieces
1 egg yolk

Poached Pears
2 ripe medium pears
3 cups water
1 cup sugar
2 tablespoons lemon juice
1/8 teaspoon salt

Frangipane
6 tablespoons butter, at room temperature
2/3 cup sugar
3/4 cup ground blanched almonds
2 teaspoons flour
1 teaspoon cornstarch
1 large egg plus 1 egg white
1 teaspoon vanilla extract
1 teaspoon dark rum (optional)
1 teaspoon almond extract

Poaching Pears
Combine the water, sugar, lemon juice and salt in a saucepan large enough to hold all the pears and bring to a simmer over medium-high heat. Meanwhile, cut the pears in half, remove the seed core and fibrous cores at either end, then peel the pears.

Add the pear halves to the simmering syrup and reduce heat to low. Cover, and let pears poach for about 10 minutes. The pears will become slightly translucent, very tender, and easily pierced with a knife or skewer.

Let the pears cool in the liquid until room temperature before using. Or, you can store them in their liquid in the refrigerator for up to 2 days.

Tart Shell
Put the flour, confectioner’s sugar, and salt in a food processor and pulse a few times to combine. Add the pieces of cold butter and pulse until the butter is cut into pea-sized pieces. Add the egg yolk and combine in several pulses until the dough starts to turn from dry to clumpy. Ensure you do not overwork the dough – or let it form into a large ball. If the one egg yolk is not enough, then add a fraction of water till you get shaggy clumps.

Butter a 9 inch tart tin with removable bottom. Turn the dough out into the tin and press into the bottom and up the sides with your fingers. You may not need all the dough – save the extra for patching the shell after you bake it.

Freeze the tart shell for at least 1 hour. When you are ready to bake it, preheat the oven to 375 degrees.

To partially bake the tart shell, take a piece of foil and butter the shiny side, then press the buttered side tightly to the shell. Place the tart shell on a baking sheet and bake for about 25 minutes, until the shell is dry and lightly colored. If any places have cracked, repair with the extra dough, then cool on a rack until room temperature.

Frangipane
Combine the butter and sugar in the food processor and combine until smooth. Add the ground almonds and blend together. Add the flour and cornstarch, and then the egg and egg white. Process the mixture until it is very smooth. Add in the vanilla, almond extract and rum just to blend. The frangipane can be used immediately or you can store it in the refrigerator for up to 2 days. If it becomes too firm in the fridge, let it sit at room temperature for a while to soften before using.

Assembly
Preheat the oven to 350 degrees. Spread the frangipane evenly into the cooled tart shell.

Take the poached pears out of their liquid and drain them on paper towels and pat dry. Cut each pear half crosswise into 3/8 in thick slices. Do not separate the pear half yet.

Slide a spatula or other flat utensil underneath the pear so you can transfer the entire half onto the tart. Press on the pear to fan the slices toward the top narrow end of the pear. Slide the pear half onto the frangipane carefully.

Repeat with three other pear halves until there are four halves on the tart, evenly spaced.

Place the tart on a baking sheet and bake in the oven for about 45-50 minutes, until the frangipane is puffed, golden brown, and firm to the touch. Cool the tart on a wire rack.

Before serving, you can dust confectioner’s sugar over the tart.

Notes: I usually poach 3 pears, just in case I ruin one or two of the halves in the cutting process.

Source: adapted from Dorie Greenspan

Posted in Desserts, Fruit, Morning Teas/High Teas, Picnic Food, Tarts/Flans/Quiches/Pies | 2 Comments

Ricotta & Sage MeatballsPrint Recipe

I have given up on pre -dinner snacks in our household, usually because dinner is such a big event – as is dessert. So I do not expect people to eat anything, aside from a few olives or spiced nuts, before they make their way through the feast I will inevitabley serve. That being said, there are occasions when nibbles (including meatballs like these) are warranted – and those are ‘casual’ drinks. You know those times you invite the neighbours over for a Saturday afternoon glass of wine or you have someone popping over to discuss a matter and you know (because it has happened so many times before) that conversation will take place with a champagne in hand. Those are the times that these little morsels are very much needed.

So onto the meatballs, I found the original recipe a little overspiced – the sage was doing battle with a heap of toasted fennel seeds and it did not win. So I removed the fennel and made them again and they were just right. Perfect with a little dipping of marinara sauce and perfect for your next lot of casual visitors…

Ingredients
1/3 cup whole-milk ricotta
2 tablespoons vegetable oil plus more for frying
3 garlic cloves, minced
1 teaspoon dried sage
1 teaspoon crushed red pepper flakes
1/2 teaspoon kosher salt
8 ounces ground pork
18 small fresh sage leaves (or large ones cut into small pieces)
3/4 cup all-purpose flour
1 large egg, beaten to blend
2 cups panko (Japanese breadcrumbs)
Marinara sauce, warmed (optional)

Line a baking sheet with parchment. Stir ricotta and 2 tablespoons oil in a medium bowl until smooth. Mix in garlic and next 4 ingredients. Add pork and gently fold until just combined.

Scoop out scant tablespoon-fuls of pork mixture. With dampened hands, roll portions between your palms into 1-inch balls and place on your sheet. Wrap 1 sage leaf (or piece of a sage leaf) around each ball and press gently to adhere.

Place flour, egg, and panko in 3 separate medium bowls. Working with 1 meatball at a time, dredge in flour, rolling between your hands to remove excess flour. Dip in egg, allow excess to drip back into bowl. Roll meatball in panko, pressing gently to coat. Return to sheet.

Attach deep-fry thermometer to side of a large heavy pot. Pour in oil to a depth of 2-inch. Heat over medium heat until thermometer registers 350°. Line another baking sheet with parchment and set a wire rack inside.

Working in batches, fry meatballs, turning often, until light golden and crisp, about 1 minute (they will finish cooking in the oven). Transfer to wire rack and let cool.

Preheat oven to 275°. Bake meatballs in batches on wire rack in baking sheet until cooked through, about 15 minutes. Serve, or keep warm in oven for up to 45 minutes.

Pour some warm marinara into a small bowl and serve alongside for dipping.

Notes: If you would prefer a little less sage then skip the sage leaf stage and just roll into balls, coat and cook as instructed.

Source: adapted from Bon Appetit

Posted in Nibbles & hors d'oeuvres, Picnic Food, Starters | 2 Comments

Summer Squash Gratin with Salsa Verde & GruyerePrint Recipe


Here is another gem from the master of taste sensations; Suzanne Goin. Suzanne has the ability of turning the plainest of ingredients (and squash is certainly one of those) into absolutely mouth watering dishes that people will keep picking at until the very last morsel is gone.

So this is what she does to your humble squash – with help of an excellent salsa verde, some shallots & garlic, breadcrumbs and a fine grating of gruyere. A gratin that is so full of flavour that is could quite easily be served on its own with a fine glass of merlot – which it has been in our house on more occasions than I can remember.

Ingredients
2 pounds of summer squash
kosher salt & pepper
3 tablespoons salted butter
1 teaspoon minced garlic
1 tablespoon of fresh thyme
3/4 cup sliced shallots (scallions for the US)
1/2 cup of salsa verde (recipe below)
1 1/2 cups of fresh breadcrumbs
1 cup of grated Gruyere cheese

Heat the oven to 400 degrees. Cut the squash into 1/8-inch-thick slices. Toss the slices in a large bowl with 1 teaspoon kosher salt, and let sit for 10 minutes.

Place the breadcrumbs in a bowl. Heat a small saute pan over medium heat for 1 minute. Swirl in the butter and cook for a few minutes, until it browns and smells nutty. Pour the brown butter over the breadcrumbs (being sure to scrape all the brown bits into the bowl with a rubber spatula). Wait a minute or so for the butter to cool, and toss well.

Drain the squash and transfer it to a large mixing bowl. Add the shallots, minced garlic, thyme, 1/2 cup salsa verde, and some pepper. Toss to combine, and add the cheese and half the butter-coated breadcrumbs. Toss again, and taste for seasoning. (The raw garlic will taste strong at this point but will be delicious when cooked.)

Place the squash in a pretty 9-by-9-inch (or similar) gratin dish. Scatter the remaining breadcrumbs over the top, and bake 35 to 40 minutes, until the squash is tender and the top is crisp.

Salsa Verde
1 teaspoon fresh marjoram or oregano leaves (1/2 teaspoon dried)
1/4 cup coarsely chopped mint
1 cup coarsely chopped flat-leaf parsley
3/4 cups extra-virgin-olive-oil”>extra-virgin olive oil
1 small clove garlic
1 anchovy
1 tablespoon salted capers, rinsed & drained
1/2 lemon, for juicing
1 tablespoon red wine vinegar
Freshly ground black pepper

The authentic way of making salsa verde is to use a mortar and pestle, which you can do – simple ground all the solid ingredients and then mic through the liquids. But I often place all ingredients in a food processor and blend until combined. It does not need to be completely liquified – chunky is fine.

Source: Suzanne Goin

Posted in Sides, Starters, Vegetables, Vegetarian | Leave a comment